Orchestrating Jobs On Openshift And Kubernetes
Openshift and Kubernetes have had support for Jobs for several versions now. A job is a pod that is expected to run for a finite period of time and then exit. As long as the pod finishes without an error, the job is finished and the pod is not restarted. This is different from when we use a ReplicationController for long running services that ensure pods are restarted anytime they exit.
Jobs can be used to execute one-off tasks, while still leveraging the PaaS for scheduling, networking, etc. For example, we can use jobs to “Run Integration Tests”, “Run Stress Tests”, “Generate End of Month Reports”, etc.
The built in support for jobs is great for when we want to do one thing (or maybe one thing several times), but how about more complex workflows where jobs execute one after another, sometimes branching to do several jobs in parallel? We need an external system to provide orchestration and tie all the jobs together.
This post will lay out how we can use Jenkins Pipelines to orchestrate multiple jobs, potentially with a complex workflow. By the end, you should be able to implement your own complex workflows in Openshift and Kuberentes!
A Quick Note on Jenkins
Traditionally, Jenkins is used as a Continuous Integration server that uses an array of plugins to build, test, and publish software artifacts. This post advocates for a very different role: Jenkins should be used for orchestrating workflows in OpenShift or Kubernetes, where the real work is done. This means that we no longer need to pile on plugins in Jenkins or layer dependencies for different build processes into our Jenkins Agents, Jenkins only needs enough plumbing to manage work happening in the PaaS. Instead, we use immutable containers to perform our builds, tests, and other tasks.
Step One: Draft the Target Workflow
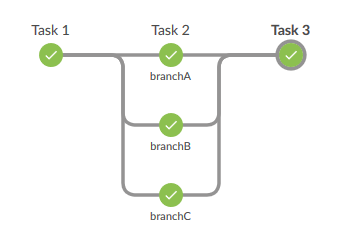
It always helps to have a target. In this post, we’ll develop a toy workflow that looks like this:

This is what it will look like in Jenkins (using Blue Ocean) once we are done. To get this picture, I implemented an empty pipeline and ran it once. Here is what that pipeline looks like:
stage ("Task 1") {

}


stage ("Task 2") {
    parallel branchA: {

    }, branchB: {

    },
    branchC: {

    }
}

stage ("Task 3") {

}
There’s a lot of blanks that need to be filled in, but this gives us a skeleton to start with (and verify we’re implementing the process we want).
Step Two: Create Images for Tasks
Since all the real work is going to happen on the PaaS, we need to package up any executables and scripts as images. This is just like building a regular application like a web site, but instead of packaging a long running service we are packaging a one off task!
Say we want to run performance tests. One way to do that is to use JMeter (or ab, or whatever, as long as it runs on Linux!). To do this on the PaaS, we’ll first want to create a reusable image that includes the JMeter binaries and any other common dependencies. Then we’ll create another image layered on top that has the scripts that we want to run.
In OpenShift this would mean putting together a couple BuildConfigs and managing these task images very similarly to how any other application is managed.
For this simple demo, I’m going to create an image for curling a website to make sure it is reachable and report the total time required for the request. This is obviously a very small task. We’d usually want to run something that requires more time/computation!
In order to notify Jenkins when the task is complete and pass along any results, I’ll be using a Jenkins plugin I’ve recently released, the Webhook Step Plugin. To make this work, each time we run a job we’ll pass a callback URL as an environment variable, and the script in the image will post to the callback when complete. I’ve previously written about how to use this plugin.
Here is the script that we’ll build into the image used for jobs. Each time we use it, we’ll pass in two environment variables: TARGET_URL with the url we want to test, and CALLBACK_URL with a url for notifying Jenkins with results.
RESPONSE_TIME="$(curl -w '%{time_total}' -o /dev/null -s $TARGET_URL)"
if [ $? -eq 0 ]; then
  curl -X POST -k -d $RESPONSE_TIME $CALLBACK_URL
else
  curl -X POST -k -d "FAILED" $CALLBACK_URL
fi
The Dockerfile is also pretty simple. Make sure to follow best practices for putting together Dockerfiles, or OpenShift may refuse to run it!
FROM centos:latest
ADD script.sh /
RUN chmod ug+rwx /script.sh && chown 1001:0 /script.sh
USER 1001
CMD ["/bin/bash", "/script.sh"]
The code for building the image, including a BuildConfig for OpenShift, can be found in the GitHub project cpitman/demo-curl-callback
Step Three: Complete the Jenkins Pipeline
In Step One we outlined what the final pipeline would look like. Now lets implement each job using the image we created in Step Two.
We’ll need a way to create the yaml for each job. We can do that with a simple Groovy function in the pipeline script:
def formatJob(buildId, id, targetUrl, callbackUrl) {
  """
apiVersion: batch/v1
kind: Job
metadata:
  name: curl-${buildId}-${id}
spec:
  template:
    metadata:
      name: curl-${buildId}-${id}
    spec:
      activeDeadlineSeconds: 60
      containers:
      - name: curl-${buildId}-${id}
        image: 172.30.1.1:5000/myproject/curl:latest
        env:
        - name: TARGET_URL
          value: ${targetUrl}
        - name: CALLBACK_URL
          value: ${callbackUrl}
      restartPolicy: Never
  """
}
For anyone used to OpenShift, it may look a little strange that we’re pointing the job to an Image instead of an ImageStream. Since jobs come from Kubernetes, there is no native integration of jobs with ImageStreams. To create a job, we’ll need to provide an explicit path to the version of the image that we want to use.
You’ll also notice that we are being careful that the job name is unique. Jobs have to have unique names across the project they are run in, which means we need names to not only be unique in any single run of the pipeline but also across multiple runs of the pipeline.
Once we have the job configuration sorted out, the rest of the pipeline is pretty straightforward:
stage ("Task 1") {
  hook = registerWebhook()

  node {
    writeFile file: 'job.yaml', text: formatJob(env.BUILD_ID, "1", "http://www.example.com", hook.getURL())
    sh "oc create -f job.yaml"
  }

  result = waitForWebhook hook
  echo "Job 1 Result (http://www.example.com): ${result}"
}


stage ("Task 2") {
    parallel branchA: {
      hookA = registerWebhook()

      node {
        writeFile file: 'job.yaml', text: formatJob(env.BUILD_ID, "2a", "http://www.google.com", hookA.getURL())
        sh "oc create -f job.yaml"
      }

      resultA = waitForWebhook hookA
      echo "Job 2a Result (http://www.google.com): ${resultA}"
    }, branchB: {
      hookB = registerWebhook()

      node {
        writeFile file: 'job.yaml', text: formatJob(env.BUILD_ID, "2b", "https://www.google.com", hookB.getURL())
        sh "oc create -f job.yaml"
      }

      resultB = waitForWebhook hookB
      echo "Job 2b Result (https://www.google.com): ${resultB}"
    },
    branchC: {
      hookC = registerWebhook()

      node {
        writeFile file: 'job.yaml', text: formatJob(env.BUILD_ID, "2c", "http://www.google.cn", hookC.getURL())
        sh "oc create -f job.yaml"
      }

      resultC = waitForWebhook hookC
      echo "Job 2c Result (http://www.google.cn): ${resultC}"
    }
}

stage ("Task 3") {
    hookThree = registerWebhook()

    node {
      writeFile file: 'job.yaml', text: formatJob(env.BUILD_ID, "3", "http://www.redhat.com", hookThree.getURL())
      sh "oc create -f job.yaml"
    }

    resultThree = waitForWebhook hookThree
    echo "Job 3 Result (http://www.redhat.com): ${resultThree}"
}
You can find the complete Jenkinsfile in cpitman/demo-workflow-pipeline.
Step Four: Run, Test, and Debug
A complex workflow is a development project all its own, so be ready to run and test the process until it is working. Once we kickoff the pipeline in Jenkins, here is what we see (edited for brevity):
Started by user Jenkins Admin
[Pipeline] stage
[Pipeline] { (Task 1)
Running on master in /var/lib/jenkins/jobs/orchestration/workspace
+ oc create -f job.yaml
job "curl-26-1" created
Job 1 Result (http://www.example.com): 0.051
[Pipeline] { (Task 2)
[Pipeline] parallel
[Pipeline] [branchA] { (Branch: branchA)
[Pipeline] [branchB] { (Branch: branchB)
[Pipeline] [branchC] { (Branch: branchC)
[branchA] Running on master in /var/lib/jenkins/jobs/orchestration/workspace
[branchB] Running on master in /var/lib/jenkins/jobs/orchestration/workspace@3
[branchC] Running on master in /var/lib/jenkins/jobs/orchestration/workspace@2
[branchC] + oc create -f job.yaml
[branchB] + oc create -f job.yaml
[branchA] + oc create -f job.yaml
[branchC] job "curl-26-2c" created
[branchA] job "curl-26-2a" created
[branchB] job "curl-26-2b" created
[branchC] Job 2c Result (http://www.google.cn): 0.718
[branchB] Job 2b Result (https://www.google.com): 0.253
[branchA] Job 2a Result (http://www.google.com): 0.108
Running on master in /var/lib/jenkins/jobs/orchestration/workspace
+ oc create -f job.yaml
job "curl-26-3" created
Job 3 Result (http://www.redhat.com): 0.162
[Pipeline] End of Pipeline
Finished: SUCCESS
Wrap Up
And thats it! As long as you can package up any tasks as an image, then you can use Jenkins and OpenShift and Kubernetes Jobs to orchestrate them together.
Depending on the type of process, you may want to investigate other options: if handling lots of data then something like Apache Spark may make sense, or if handling lots of long running business processes something like Red Hat BRMS. But for lightweight processes, this is workable!