stunnel and OpenShift (or any other virtual hosting)
In a previous post I outlined the standard techniques used with OpenShift to connect TCP clients outside of OpenShift with TCP servers running inside of Openshift’s SDN. Both NodePort and External IPs require some amount of configuration of routing, load balancing, and firewalls to work. Ideally, we could use standard Routes for all traffic, including TCP.
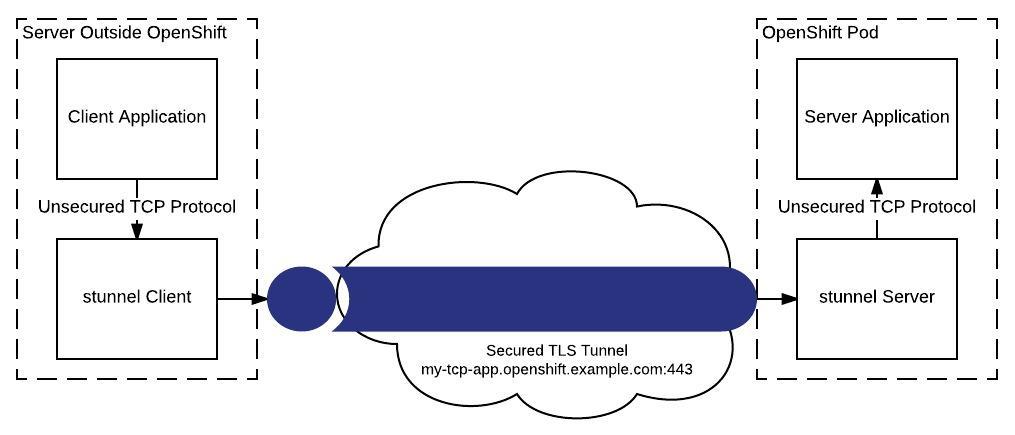
In order for TCP connections to use the router, they need to be encrypted with TLS and the client needs to support Server Name Indication (SNI). If both conditions are not met, an alternative is to tunnel traffic over TLS. This is what stunnel does. We run two instances of stunnel: a server instance inside our OpenShift pod that will terminate the tunnel, and a client instance running outside of OpenShift with our client to initiate the tunnel.
Quick Aside: Although we’re talking about a specific use case here (tunneling TCP traffic into Openshift), the exact same technique works anytime we need to take an unsecure TCP protocol and tunnel it over an insecure network. For example, if we had an internal set of applications that used an insecure TCP protocol in our data center, we could use stunnel to quickly secure inter-server traffic.
I’ve published everything you need to get an stunnel container running on OpenShift to github.com/cpitman/stunnel-openshift. It is really simple to do. Here are the parts:
- A DockerFile for building a stunnel Docker image that can run on OpenShift.
- A shell scripts that runs in the container. If a certificate isn’t inject at runtime, this script will generate a self-signed certificate. It also modifies the stunnel configuration if environment variables are defined.
- A default stunnel configuration file that tells stunnel to listen for incoming tunnel connections on port 5000 and forward all traffic to localhost:5001.
You can create a new Docker build based on this repository (oc new-build --strategy=docker --name=stunnel https://github.com/cpitman/stunnel-openshift) or to get a fully working demo you can download the stunnel-example.yml file from the repo and run the following commands:
oc process -f stunnel-example.yml | oc create -f -
echo "After deployment, the stunnel example will be available at `oc get route stunnel --template '{{.spec.host}}'`:443"
This will echo out the URL that can now be used on the client side to connect to your tunnel.
You will now need to install stunnel locally (check your package
manager, or https://www.stunnel.org/downloads.html). Next you need a
configuration file that tells the client the other end of the tunnel. Here is
my file stunnel-client.conf:
client=yes
sslVersion = TLSv1.2
foreground = yes
pid =

[service]
accept=5002
connect=stunnel-demo.rhel-cdk.10.1.2.2.xip.io:443
verify=0
This configuration tells stunnel to act as a client, to listen locally on port
5002, to forward all traffic received on that port to
stunnel-demo.rhel-cdk.10.1.2.2.xip.io:443 (replace with your stunnel route),
and for this demo turns off validation of the server’s cert since we are
generating a self-signed cert for this example. In a real-world scenario you
would want to use a trusted cert and set verify to a non-zero value.
You can now start stunnel: stunnel stunnel-client.conf
Now anyone who wants to connect to our TCP service in OpenShift can instead connect to port 5002 on the host running the stunnel client, and stunnel will encrypt and forward all traffic into OpenShift.
We can now try it out. You’ll need to have either telnet or socat installed.
With telnet, run telnet localhost 5002. With socat, run
socat - TCP:localhost:5002. Either way, you are now connected to our echo
server in OpenShift via an encrypted tunnel. Type any message and press enter
to have the message echoed back to you.
Take Away
Using stunnel lets us bridge any kind of TCP traffic to our OpenShift containers with no modification to the original server or client, or any changes to networking, load balancers, or firewalls. It also helped us encrypt and secure all traffic between client and server.